WCF Simple Example in Visual Studio 2010
This topic is covered in multiple posts
- Creating simplest solution with default endpoints (you’re reading it right now)
- Manually adding and configuring the endpoints
- More to come…
It’s been a long, long time since I wrote the original WCF Simple Example post. It was even before Visual Studio 2008 and since then, a lot of things changed. As still a lot of folks place comments and questions to that post, let’s have a look at what we currently have to do to get a service up and running and consume it in a client.
This time we’ll start with a class library assembly (a .dll) and we’ll host the service inside a console application. The client will use a Windows Forms application again. Although we do everything in Visual Studio 2010, most will be usable in VS2008.I will mention it when it isn’t and provide an alternative. I’ll be a bit more descriptive about what we have to do, so this post is a little longer than the original.
Create Project
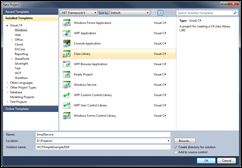
First create a new “class library”, this will become the implementation of our service. Choose New Project and select the Class Library as project template. At the bottom, set as name for the project “EmailService” and the solution name “WCFSimpleExample2010”. If you can’t set the solution name, check the Create directory for solution box.
Create the contract
We’ll first create the contract with only one method; or operation as they are called in WCF. The “class library” should have added a class called “Class1”, you should rename it to IEmailValidator.cs and make it an interface with the same name.
Now add a single method signature called ValidateAddress that takes one string argument called emailAddress and returns a boolean. This is a normal interface, nothing fancy and the end result is as follows:
public interface IEmailValidator
{
    bool ValidateAddress(string emailAddress);
}
Now we need to tell WCF that this is our contract. We do that by adding attributes, but first we need to add a reference to System.ServiceModel. Right-click the project and select Add reference and select System.ServiceModel from the list. I’m using the Visual Studio 2010 Pro Power Tools so my screen might look different from yours, but the idea is the same.
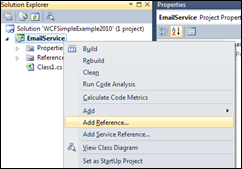
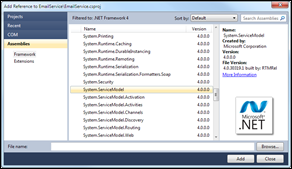
Now you can add the attributes to your interface. On top of the interface place the ServiceContract attribute and on the operation place the OperationContract attribute. Add the using System.ServiceModel at the top of your codefile, or let Visual Studio do it for you by having your cursor in on of the attribute names. When you typed it in correctly and case sensitive, you can press CTRL + . and a context menu should appear to let you add the using automatically. Your interface should finally look like this:
[ServiceContract]
public interface IEmailValidator
{
    [OperationContract]
    bool ValidateAddress(string emailAddress);
}
Create the service implementation
Now that we’ve created the contract we need to write code for the service to actually do what we want it to do. Create a new class and make it implement the interface. After that, use a regular expression to verify the email address and return true value if it’s correct. You should have something like the following code, or make up your own. 🙂
public class EmailValidator : IEmailValidator
{
    public bool ValidateAddress(string emailAddress)
    {
        Console.WriteLine("Validating: {0}", emailAddress);

        string pattern = @"^([0-9a-zA-Z]([-.w]*[0-9a-zA-Z])*@(([0-9a-zA-Z])+([-w]*[0-9a-zA-Z])*.)+[a-zA-Z]{2,9})$";
        return Regex.IsMatch(emailAddress, pattern);
    }
}
Now you have the two most important classes for your service. You don’t actually have to use an interface, but it’s a best practice. That way you can inherit multiple interfaces for or do versioning with different interfaces.
Creating the host
As said, for our host we’ll initially use a console application. Choose to add a new project and now have a Console Application as project template. Name it “ConsoleHost”.
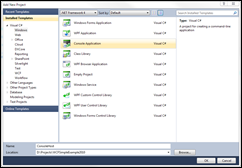
Add the reference to System.ServiceModel again and also to your EmailService project. In your Main method, create a ServiceHost object and give it the correct arguments in the constructor, as shown below.
Type serviceType = typeof(EmailValidator);
Uri serviceUri = new Uri("http://localhost:8080/");

ServiceHost host = new ServiceHost(serviceType, serviceUri);
host.Open();
On line 4 is the creation of the ServiceHost object. As first argument it receives the implementation of our service as a type. And a base address as second argument. Read more about base addresses here and more about hosting here. The type is defined on line 1 and the base address on line 2.Finally on line 5 our host is started.
WCF4 : Default endpoints
Now here’s a difference in .NET Framework 4.0 because this is not possible in previous version of .NET. Currently the default endpoints are used, which is a new feature to make configuration of your services less of a hassle. I like to explicitly define everything in detail so everyone knows what happens. But for our example, this works quite well. If you’re not using .NET 4.0 you might want to continue to part 2 of this weblog post, which will be posted later.
You could add the default endpoints yourself by adding host.AddDefaultEndpoints(); to the code, right before the host.Open(); statement.
How can we see what endpoints are configured by default? I have a little script from way back that displays everything currently running. I won’t go into details, just paste the following after the host.Open(); part.
#region Output dispatchers listening
foreach (Uri uri in host.BaseAddresses)
{
    Console.WriteLine("t{0}", uri.ToString());
}

Console.WriteLine();
Console.WriteLine("Number of dispatchers listening : {0}", host.ChannelDispatchers.Count);
foreach (System.ServiceModel.Dispatcher.ChannelDispatcher dispatcher in host.ChannelDispatchers)
{
    Console.WriteLine("t{0}, {1}", dispatcher.Listener.Uri.ToString(), dispatcher.BindingName);
}

Console.WriteLine();
Console.WriteLine("Press <ENTER> to terminate Host");
Console.ReadLine();
#endregion
Now you should be able to see the endpoints like in the first following screenshot. You can use a browser like Internet Explorer to go to the service uri and look at the default MEX endpoint.
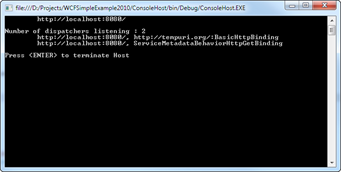
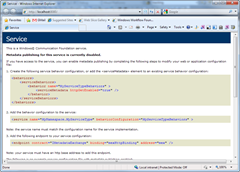
As you can see it’ll tell you that a MEX endpoint (aka metadata) isn’t configured yet. Now an easy way would be to do this via the new default endpoints. My first impression was that this would work.
Type serviceType = typeof(EmailValidator);
Uri serviceUri = new Uri("http://localhost:8080/");

ServiceHost host = new ServiceHost(serviceType, serviceUri);
host.AddDefaultEndpoints();
// This actually doesn't just simply work.
host.AddServiceEndpoint(new ServiceMetadataEndpoint());
On line 5 you can see that we add the default endpoints and line 7 adds the ServiceMetadataEndpoint, or the MEX endpoint. Unfortunately it cannot add the Metadata behavior itself, so you still have to do this yourself. The other way it to specify in configuration that you want metadata enabled. Also new in WCF4 is that you can inherit configuration. You can specify in either the machine.config or in your local configuration what should be enabled by default for WCF services. I recommend you don’t do this in machine.config, but that’s just my opinion. Here’s how I enabled it in my project configuration, the app.config of our console host. Remember that in the follow up post to this, we’ll do this the old fashioned way, which will work in Visual Studio 2008 and has my preference.
<?xml version="1.0" encoding="utf-8" ?>
<configuration>
  <system.servicemodel>
    <behaviors>
      <servicebehaviors>
        <behavior>
          <servicemetadata httpgetenabled="True"></servicemetadata>
        </behavior>
      </servicebehaviors>
    </behaviors>
  </system.servicemodel>
</configuration>
As you can see, I have not specified a name for the behavior so in WCF4 this means it’ll be used by all services. This also means that every service needs a base address for http endpoints.
For reference, here’s the code for our console host:
static void Main(string[] args)
{
    Type serviceType = typeof(EmailValidator);
    Uri serviceUri = new Uri("http://localhost:8080/");

    ServiceHost host = new ServiceHost(serviceType, serviceUri);
    host.Open();

    #region Output dispatchers listening
    foreach (Uri uri in host.BaseAddresses)
    {
        Console.WriteLine("t{0}", uri.ToString());
    }

    Console.WriteLine();
    Console.WriteLine("Number of dispatchers listening : {0}", host.ChannelDispatchers.Count);
    foreach (System.ServiceModel.Dispatcher.ChannelDispatcher dispatcher in host.ChannelDispatchers)
    {
        Console.WriteLine("t{0}, {1}", dispatcher.Listener.Uri.ToString(), dispatcher.BindingName);
    }

    Console.WriteLine();
    Console.WriteLine("Press <ENTER> to terminate Host");
    Console.ReadLine();
    #endregion
}
Accessing the metadata
Because we now have enabled our service and our metadata endpoint, the MEX endpoint, we can view it through Internet Explorer or another browser. Execute the console host (it has to be alive or the endpoints won’t be accessible) and browse to the URI of your service : http://localhost:8080/
If this shows a nice screen with a link to the WSDL you’re very likely done with the service.
Create client application
We’ll now add another project that will consume the service and will be able to verify if entered email addresses are valid, or at least according to our regular expression.
Add a new console application like before and this time call it ConsoleClient. Make sure your service (the host) is running, but don’t have it running in debug mode. Easiest way is to set the ConsoleHost project as startup project en press CTRL + F5 to run it without debugging turned on.
We now need a proxy class that sits between our client and service. There are two ways to create a proxy for our service. I have a preference for doing it manually, so you know what exactly is happening. I’ll show that first.
Manually create proxy
First start up a Visual Studio 2010 (or Visual Studio 2008) Command Prompt and move to the location of the ConsoleClient. Because it’s a Visual Studio command prompt you should have access to the proxy generator svcutil.exe. Input the following commandline
svcutil http://localhost:8080/ /o:ServiceProxy.cs /config:App.Config /n:ConsoleClient
This should generated two files, the service proxy and an application configuration file. Go back to Visual Studio and in your ConsoleClient application make all files visible through the icon at the top of the Solution Explorer, as seen in the right screenshot. The App.Config and ServiceProxy.cs should become available and you can include these.
Update
The console window screenshot shows ConsoleHost as namespace, this is incorrect and should be ConsoleClient as the full commandline statement above states.</span>
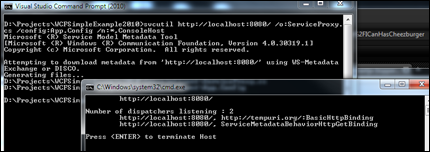
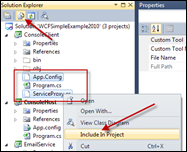
When we ran svcutil.exe the first argument was the location of our service as specified in the host. This is the base address. The second argument is what the tool should output, our proxy. The third argument is that we also want it to update our application configuration and if it’s not available, create it. The last argument is the namespace our proxy should be placed in (or should have), which should now be the same as our application itself.
Call the service
Now we can finally start consuming the service. When you go to your Main method in your Program class again, you can access the proxy class, which is the name of your service with Client suffixed. So ours is EmailValidatorClient.
EmailValidatorClient svc = new EmailValidatorClient();
bool result = svc.ValidateAddress("[email protected]");
In line 1 you can see the proxy being initialized. Does doesn’t mean the connection is set up, this is done on first call. Line 2 shows the calling of the service and getting the result back.
This is our entire method Main which will continue to ask for email addresses until you enter none.
static void Main(string[] args)
{
    while (true)
    {
        Console.WriteLine("Enter an email address or press [ENTER] to quit...");
        string emailAddress = Console.ReadLine();

        if (string.IsNullOrEmpty(emailAddress))
            return;

        EmailValidatorClient svc = new EmailValidatorClient();
        bool result = svc.ValidateAddress(emailAddress);

        Console.WriteLine("Email address is valid : {0}", result);
    }
}
Creating proxy through Visual Studio, the easy way
Instead of creating the service proxy manually, via svcutil.exe, you can also let Visual Studio create it for you. Just right-click the project and select ‘Add Service Reference…’ You’ll get a dialog window where you enter the address of your service and the namespace.
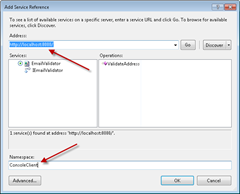
Now we entered ConsoleClient as namespace, but it concatenates this to the already existing namespace. So now you can access the EmailValidatorClient via ConsoleClient.ConsoleClient.EmailValidatorClient. One of the reasons I don’t like to use this automatically generated proxy class. You should now not forget to add a using statement to this namespace at the top of your class. Probably a better solution is to set the namespace to Proxies or something, in the dialog, so the complete namespace makes more sense.
Run the client
While the service is still running (of not, restart it) you can right-click your ConsoleClient and select Debug and Start new instance and you’re done.
What next?
Next we’ll extend this blogpost with at least two more, step-by-step blogposts explaining how to manually add endpoints and how to host your service in IIS. You can read more about it here