Silverlight vs. Windows Forms or ASP.NET
Some time ago I went to a great presentation, organized by DotNed, held at Vicrea and given by Dennis Vroegop and Thomas Huijer. At some point Dennis Vroegop mentioned that he saw a lot of old Windows Forms developers, create WPF applications like they were still developing Windows Forms applications. What Dennis meant was that these developers were handling click events the same way they did before. At first I thought that he was talking about boring line of business (LOB) applications with just textboxes and buttons in them, without a cool design or something different in user experience (UX). In a series of posts I’ll see if I can lighten up both of our points. So this is not really a one versus the other, but more on showing you how Silverlight can help you create a better user interface and have more powerful databinding.
First I’m going to explain what I meant by creating a normal ListBox with layout that’s extremely hard to accomplish in Windows Forms. We’ll keep it extremely simple. After that I’ll show how you can do this with Master-Detail as well, very easily. And later I’ll show you how to do this with an MVVM implementation.
**1.Creating a class and repository
** We need some data and we normally get this from a database using webservices. In this example I’ll create a repository class, as I said I’m going to keep it extremely simple. Building webservices via WCF is discussed extensively throughout this weblog elsewhere.
We’ll take on of my favorite subjects, games. Let’s create a class that contains our data.
public class Game
{
    public string Name { get; set; }
    public int YearOfRelease { get; set; }
    public string Developer { get; set; }
    public string ImageUrl { get; set; }
}
Now let’s create our repository.
public class Repository
{
    public static ObservableCollection<game> GetAllGames()
    {
        return new ObservableCollection<game>()
        {
            new Game() { Name = "Assassin's Creed : Brotherhood", Developer = "Ubisoft", YearOfRelease = 2010, ImageUrl = @"http://upload.wikimedia.org/wikipedia/en/2/2a/Assassins_Creed_brotherhood_cover.jpg" },
            new Game() { Name = "Call of Duty: Modern Warfare 2", Developer = "Infinity Ward", YearOfRelease = 2009, ImageUrl = @"http://upload.wikimedia.org/wikipedia/en/d/db/Modern_Warfare_2_cover.PNG" },
            new Game() { Name = "FIFA 11", Developer="Electronic Arts", YearOfRelease = 2010, ImageUrl = @"http://upload.wikimedia.org/wikipedia/en/9/97/Fifa11_keyart_uk-492x600.jpg" },
            new Game() { Name = "Quake", Developer = "id Software", YearOfRelease = 1996, ImageUrl = @"http://upload.wikimedia.org/wikipedia/en/4/4c/Quake1cover.jpg" },
            new Game() { Name = "Half-Life", Developer = "Valve", YearOfRelease = 1998, ImageUrl = @"http://upload.wikimedia.org/wikipedia/en/f/fa/Half-Life_Cover_Art.jpg" }
        };
    }
}
I’ve put these two classes inside the Silverlight Application I’ve created. Now that we’ve got our data, let’s first create some layout that can present our games.
<usercontrol x:class="BindingExample.MainPage" xmlns="http://schemas.microsoft.com/winfx/2006/xaml/presentation" xmlns:x="http://schemas.microsoft.com/winfx/2006/xaml" xmlns:d="http://schemas.microsoft.com/expression/blend/2008" xmlns:mc="http://schemas.openxmlformats.org/markup-compatibility/2006" mc:ignorable="d" d:designheight="300" d:designwidth="400">
    <stackpanel orientation="Horizontal" verticalalignment="Top" margin="10">
        <listbox x:name="gamesListBox" itemssource="{Binding}" width="300" height="300">
        </listbox>
    </stackpanel>
</usercontrol>
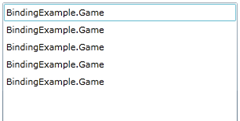
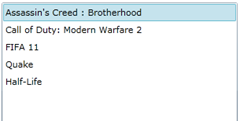
This is very basic and it doesn’t even show the right results as you can see in the first image below. Let’s change the XAML so that it’ll show the results we’d normally expect.
<stackpanel orientation="Horizontal" verticalalignment="Top" margin="10">
    <listbox x:name="gamesListBox" itemssource="{Binding}" displaymemberpath="Name" width="300" height="300">
    </listbox>
</stackpanel>
As you can see, the only thing changed is the added DisplayMemberPath attribute. But we can do this in Windows Forms as well. Let’s do some magic.
<listbox x:name="gamesListBox" itemssource="{Binding}" width="300" height="300">
    <listbox.itemtemplate>
        <datatemplate>
            <stackpanel grid.column="1" margin="3,0,0,0">
                <textblock text="{Binding Path=Name}" fontweight="Bold" margin="0" padding="0"></textblock>
                <stackpanel orientation="Horizontal" margin="3,0,0,0">
                    <textblock text="Released" width="80"></textblock>
                    <textblock text=": "></textblock>
                    <textblock text="{Binding Path=YearOfRelease}" width="50" margin="0" padding="0"></textblock>
                </stackpanel>
                <stackpanel orientation="Horizontal" margin="3,0,0,0">
                    <textblock text="Developer" width="80"></textblock>
                    <textblock text=": "></textblock>
                    <textblock text="{Binding Path=Developer}"></textblock>
                </stackpanel>
            </stackpanel>
        </datatemplate>
    </listbox.itemtemplate>
</listbox>
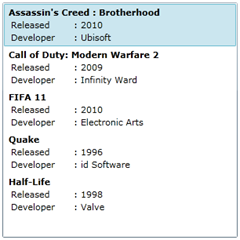
Now this is nice. What’s happening here?
- We removed the DisplayMemberPath attribute, as we are going to very specifically define how we want to see the data.
- We’ve added a DataTemplate, which describes the visual structure of a data object, according to MSDN 🙂
- Next we’ve defined some StackPanels and TextBlocks to define where and how to show the data.
We’ve used more than one property from our Game class, some bold text and margins to make it more attractive.
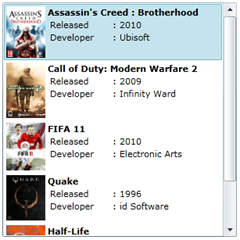
I think this is very user friendly. Imagine a lot of customers in your database, some of them with names very alike or with offices in different locations. Instead of just seeing the name of the customer, you also get presented the location, etc. Now as these are games, there’s probably a little box art available somewhere on the web. Let’s show this as well. Imagine that instead of box art, you present photos of your customers their faces! 😉
<listbox x:name="gamesListBox" itemssource="{Binding}" width="300" height="300">
    <listbox.itemtemplate>
        <datatemplate>
            <grid>
                <grid.columndefinitions>
                    <columndefinition></columndefinition>
                    <columndefinition></columndefinition>
                </grid.columndefinitions>
                <image source="{Binding Path=ImageUrl}" width="50" stretch="UniformToFill" grid.column="0"></image>
                <stackpanel grid.column="1" margin="3,0,0,0">
                    <textblock text="{Binding Path=Name}" fontweight="Bold" margin="0" padding="0"></textblock>
                    <stackpanel orientation="Horizontal" margin="3,0,0,0">
                        <textblock text="Released" width="80"></textblock>
                        <textblock text=": "></textblock>
                        <textblock text="{Binding Path=YearOfRelease}" width="50" margin="0" padding="0"></textblock>
                    </stackpanel>
                    <stackpanel orientation="Horizontal" margin="3,0,0,0">
                        <textblock text="Developer" width="80"></textblock>
                        <textblock text=": "></textblock>
                        <textblock text="{Binding Path=Developer}"></textblock>
                    </stackpanel>
                </stackpanel>
            </grid>
        </datatemplate>
    </listbox.itemtemplate>
</listbox>
 And this results in a very simple but very nice ListBox with very usable items. And the best part is that you can still use gamesListBox.SelectedItem to get the complete Game object, as you’d expect.
Of course it’s even better to add the DataTemplate to a resource, which will result in the following XAML.
<usercontrol.resources>
    <datatemplate x:key="gameDataTemplate">
        <grid>
            ...
        </grid>
    </datatemplate>
</usercontrol.resources>
<stackpanel orientation="Horizontal" verticalalignment="Top" margin="10">
    <listbox x:name="gamesListBox" itemssource="{Binding}" width="300" height="300" itemtemplate="{StaticResource gameDataTemplate}"></listbox>
</stackpanel>
I hope this clarifies my point on how you can enhance your boring Line of Business (LOB) application with better usability for your end users.</game></game>


