WCF Simple Example
Update : This post was updated and is much more explaining in this post, WCF Simple Example in Visual Studio 2010 On my WCF Introduction post I received a trackback to an example that should be really simple to start WCF with. I’m not here to judge the post (although I could ;-), but it got me thinking. Although I created some small posts on how WCF works, together it might still be too much for people that just want to see the simplest example. So this post is about that example.
There are two ways to present this. In this example I’ll use as little code as possible in as few locations as possible. The other way is using the WCF Service Library project that comes with the VS2005 WCF Extension but requires a lot more code, text, etc. More about the in another post.
I’m not judging, but the other post by Ralf Sudelbücher has only one project containing both service, host and client. I’m using two projects, because WCF is all about getting clients to communicate with a service. Let’s start.
- First, install Visual Studio 2005, .NET Framework 3.0 and the .NET Framework 3.0 WCF/WPF extensions.
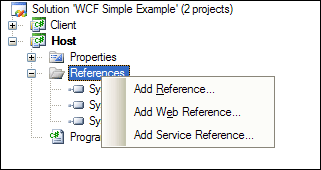
You don’t need the SDK. And don’t worry about the November 2006 CTP status, this is the latest version. 2. Open Visual Studio 2005 and create a new console application project, called “Host”. 3. Add a reference to the project for the System.ServiceModel assembly. It’s the core assembly used by WCF.
If you’re using Visual Studio 2008, check out this article if you have problems with adding the service reference. 4. Add a using statement at the top of your class for System.ServiceModel.
using System.ServiceModel;- Create a service contract and implement it in the Program.cs file, directly under your Program class. In this example I’m expecting a name and concatenate this to “Hello ” and return this immediately.
[ServiceContract]
class HelloService
{
  [OperationContract]
  string HelloWorld(string name)
  {
    return string.Format("Hello {0}", name);
  }
}- In your Program class, inside the static Main method we need code to host our service. We’ll add two endpoints, one for our service and one for extracting the metadata.
static void Main(string[] args)
{
  // We did not separate contract from implementation.
  // Therefor service and contract are the same in this example.
  Type serviceType = typeof(HelloService);

  ServiceHost host = new ServiceHost(serviceType, new Uri[] { new Uri("http://localhost:8080/") } );

  // Add behavior for our MEX endpoint
  ServiceMetadataBehavior behavior = new ServiceMetadataBehavior();
  behavior.HttpGetEnabled = true;
  host.Description.Behaviors.Add(behavior);

  // Create basicHttpBinding endpoint at http://localhost:8080/HelloService/
  host.AddServiceEndpoint(serviceType, new BasicHttpBinding(), "HelloService");
  // Add MEX endpoint at http://localhost:8080/MEX/
  host.AddServiceEndpoint(typeof(IMetadataExchange), new BasicHttpBinding(), "MEX");

  host.Open();

  Console.WriteLine("Service is ready, press any key to terminate.");
  Console.ReadKey();
}
At line 7 we’re instantiating our ServiceHost object, specifying a base address at localhost on port 8080.
At line 15 we’re adding our endpoint, using basicHttp, for our service.
At line 17 we’re adding our metadata endpoint. For this we also need to specifiy the MetadataExchange behavior, which we do at line 10, adding it to our ServiceHost at line 12.At line 11 we’re enabling HttpGet, which means we can view the metadata using a browser.
At line 19 we just open the host and everything should work fine. Lines 21 and 22 are waiting on confirmation of a user to close the console application, automatically closing our ServiceHost and thus our service.
We only need to ad a using statement for the System.ServiceModel.Description because adding a MEX endpoint using code requires this namespace.
using System.ServiceModel.Description;- Now this is done, let’s try and run our service. If all goes well, we’ll see the message that the service is ready. You can check it by opening up a browser and visiting http://localhost:8080/
- Now we need to create our client. Add a new Windows Forms project called “Client” to our solution.
- Right-click the “Host” project and choose “Debug” and then “Start New Instance”. Then right-click the “Client” project and select “Add Service Reference”. In the dialog that appears type in the address http://localhost:8080/ and press “OK”. Now you should have a new folder in your “Client” project with the reference to your service. Stop the service that’s still running in the background.
The System.ServiceModel assembly should be referenced now, the app.config has been added and modified as well as a proxy class under your “localhost” service reference. 10. On your form in the “Client” project, add a textbox and a button. Double-click the button. 11. Add three lines to your button-click event.
private void button1_Click(object sender, EventArgs e)
{
  localhost.HelloServiceClient proxy = new Client.localhost.HelloServiceClient();
  string result = proxy.HelloWorld(textBox1.Text);

  MessageBox.Show(result);
}- Again, right-click the “Host” project and select to start a new instance and do the same for your Windows application. Then fill in your name and press the button.
Congratulations, the most easy and fastest way to create a WCF service. Source-code can be downloaded here.
UPDATE : The zip file was broken, but is now fixed again.
Update : This post was updated and is much more explaining in this post, WCF Simple Example in Visual Studio 2010