Configuring an ASP.NET Membership provider instead of LocalSqlServer
On the frontpage of BloggingAbout.NET you can see who posted comments on which articles and I found a few recent comments on a rather old post by Arjen Bloemsma about the LocalSqlServer connection string and its binding to ASP.NET Membership provider. Arjen provides a fast and easy solution that’s workable, but what if you want to configure everything completely yourself? Or better yet, you want to understand what you’re doing?
Let’s bypass the default connection string and the default Membership configuration. We’ll need more options next to the default ones, found in the ASP.NET Web Site Administration Tool. When your website is open in Visual Studio, start the tool (website) from the menu (Website -> ASP.NET Configuration). Under the ‘Provider’ tab you can select the option ‘Select a different provider for each feature (advanced)’. There you can see the default providers.
If you want to understand where these settings come from, you’ll have to take a look inside the machine.config, located in the proper framework folder. Even if you’re developing for .NET Framework 3.0 or 3.5, you’ll need to be in the .NET Framework 2.0 folder, because they all run under the 2.0 Common Language Runtime (ref 1, ref 2).

In the folder there should be a file called machine.config in which the configuration for the Membership provider and the connectionstring should be. First have a look at the connectionstring.
Side-note : Since .NET Framework 3.5 and “Client application services” I finally understand why the provider settings are in the machine.config instead of the root web.config. If you have Visual Studio 2008 installed, you should seriously open a Windows Forms application and look up the ‘Services’ tab page under your project properties. 
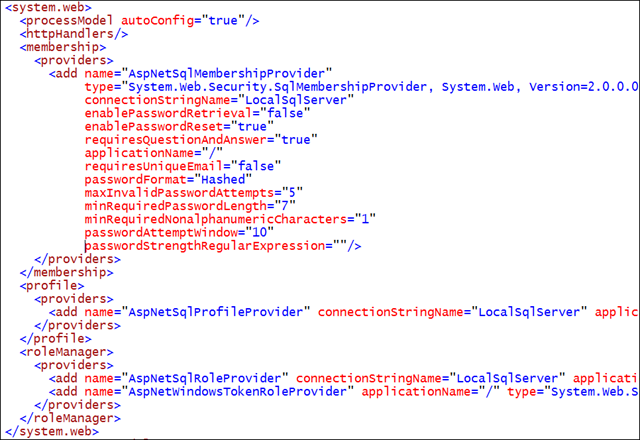
Here you can find the name and the data source (server) it’s looking for, which is a SQL Server 2005 Express edition by default. That’s where Arjen’s problem originated from. But let’s see why the Membership provider uses this specific connection string, besides the fact that it’s the only one available. In your machine.config you can again find this information. Click the image below for a larger version.
Under the membership element you find the providers. There’s only one provider here, called “AspNetSqlMembershipProvider”. You’ll notice the attribute “connectionStringName” and where it points at! I don’t think it’s wise to change these settings, even if you want to really badly. Again, Arjen gives an easy and fast solution that works much better than just changing the machine.config. But we decided that we wanted more.
We need to configure additional provider settings and have it use a new connection string. Note that the membership element is under the system.web element. We can copy the entire membership element into our own web.config, again under the system.web element.
After copying, we can make our own changes. In the example below you’ll see that I’ve removed (cleared) the previously configured membership providers. This is not necessary, you don’t need the clear attribute. Better yet, if you don’t, you’ll have something to choose from in the ASP.NET Web Site Administration tool. 😉

Note that I’ve also changed the connectionStringName attribute to “MyAspNetDB”. Here’s the configuration of my connection string. If you don’t know what connection string you should use, have a look at www.connectionstrings.com. e
<connectionstrings>
  <add name="MyAspNetDB" connectionstring="server=(local);database=aspnetdb;integrated security=true"></add>
</connectionstrings>
The ‘aspnetdb’ is the default name of the database that aspnet_regsql.exe will generate. Note that you can work with multiple application names in a single ‘aspnetdb’ database! In the large configuration example above you can see that the default application name is just a slash, or actually nothing. You can use different application names so every website can have its own users, roles and profiles. But all of them in a single database. I find having the tables in my own personal database much easier with deployment though. Again, this is an option in the aspnet_regsql.exe tool.
Because you’ve copied the configuration from machine.config and added it to your own web.config, you can now alter every available setting to your likings.
I hope this example helps and you better understand how to configure and use the membership provider and where the original information comes from. Of course you can use the same information for the role and profile providers.
