VS2008 DataDude and conditional deployment
This has taken us some time; depending on which environment you are, telling Visual Studio 2008 for Database Professionals Edition (or simply DataDude) what user it should use to deploy the SQL scripts, during an automated build. We’re working with Windows XP users, Windows Vista users and Windows 2008 Server. As you might now, XP uses the “ASPNET” user to run IIS and Vista and 2008 use the “Network Service” user.
We’re using FinalBuilder, a most excellent product, which in turn is using MSBuild and were trying to figure out how to pass variables to MSBuild, who should pass them to DataDude, which in turn would have to pass them to SQLCommand. Sounds difficult, but when you’ve figured it out, it’s quite easy! 🙂
The goal is to use “Network Service” when automated and let the user specify what user to use when running locally.
Here are the steps we took
- We’re going to use the variable TargetUser in the default MSBuild targets.
- Open the solution with the DataDude project in it.
- Right-click the project and select “Unload Project”
- Right-click the now gray project and select “Edit <projectname.dbproj>”
- Paste the following code at the bottom, just before the tag.
<propertygroup condition=" '$(Configuration)' == 'Default' ">
  <setvariables>
    <variable name="TargetUser" value="ASPNET"></variable>
  </setvariables>
</propertygroup>
5. Now the default is to use the “ASPNET” user, which we want to influence. But just remember that this value is passed on to SQLCommand when building the project.
6. Change the ASPNET in the above variable to $(DatabaseUser), so you’ll have the following.<propertygroup condition=" '$(Configuration)' == 'Default' ">
<setvariables>
<variable name="TargetUser" value="$(DatabaseUser)"></variable>
</setvariables>
</propertygroup>7. Now it’ll insert whatever is in the DatabaseUser property. We’ll still have to add it though.
8. Go to the top of your .dbproj and you should notice the tag <propertygroup> and a lot of properties beneath it.
9. Add the following property:<databaseuser>aspnet</databaseuser>10. Now we have the same effect as in step 4, but we’re providing it via a property. And properties we can change from the command-line with MSBuild!2. Running MSBuild as follows would build the script and we would pass in “network service” as user.
msbuild projectname.dbproj /p:DatabaseUser=”Network Service”
3. However, we’re not yet using the user in our scripts!!!
1. For this, open (or reload) your .dbproj file again.
2. Find the file Permissions.sql under the Scripts/Post-Deployment folder.
3. At the top you can see the “creat login” script for either your “aspnet” or “network service” user.
4. With the following script you can make it decide what to use.
I removed some code for clarity. The important part is the IF statement. We defined the TargetUser in step 1.4 of this tutorial. 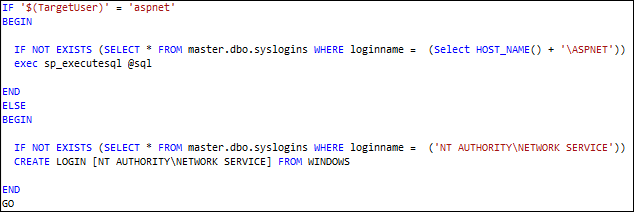 4. Save the script and you should be done.
If you’re interested how to use this in FinalBuilder, here’s how.
- In your FinalBuilder project, add an MSBuild action and define your dbproj file as in the following image. Pay attention to the Targets that should be executed.
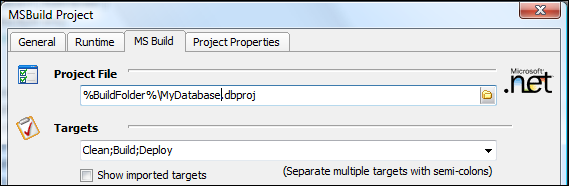 2. Now set the project properties on the last tab.
 3. I’ve used a %AspNetWorkerUser% variable, defined in FinalBuilder self. Here’s how…
4. Before building your project, add a “Define variable” action.
3. I’ve used a %AspNetWorkerUser% variable, defined in FinalBuilder self. Here’s how…
4. Before building your project, add a “Define variable” action.
Here’s how I configured mine.
I’ve used “MyAspNetWorkerUser” and set it as a user variable. Later on I copy this variable to a project variable. Just a personal preference. You do need a user variable though, but don’t set a default value. We need this to be empty.
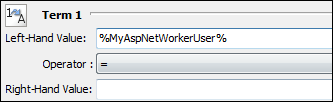
 5. Define an “If … then” action. Make sure that if your AspNetWorkerUser is empty, it executes the underlying action(s).
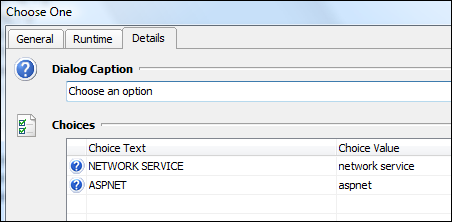
 6. Now add a “Choose one” action. I’ve setup mine as follows:
 7. The final result should be something like this

Good luck! 🙂