Colored console tracelistener for Enterprise Library 5.0
At work we’ve been using Enterprise Library for quite some time. A new colleague came in a few months ago and he’s apparently in love with log4net. And I’ve been proving over and over again that Enterprise Library logging can do what log4net can do. It’s probably that patterns & practices don’t have a budget for MVP titles, or I’d already have a few! 😉 But kidding aside, again some EntLib logging was replaced with log4net because of color coding to the console window. I thought this was indeed quite handy so I decided to write my own custom TraceListener.
For your personal pleasure I’ve immediately created a NuGet package and this is the tutorial on how to use this logger for yourself. The tutorial is very, very detailed. That’s because apparently that’s how a lot of people want it. In other words, those are the posts that get the most views and comments! But it’s really simple to get this going.
- Install-Package Common.Logging
- Install-Package Common.Logging.EntLib50
- Install-Package EnterpriseLibrary.Logging -Version 5.0.505.1
- Install-Package ColoredConsoleTraceListener
- Configure Common.Logging as described in the first steps.
- Configure Enterprise Library logging with my custom colored console trace listener
- Done
You can find the NuGet packages for the Colored Console Trace Listener here:
Enterprise Library Colored Console TraceListener
- I’m using Visual Studio 2012 but this is equally simpel in Visual Studio 2008.It uses .NET Framework 4.0 and I haven’t tested it in any other environment. If there’s a need, let me know and I’ll see what I can do.
- The tutorial creates a new console application, but you can add this to anything you’d like.
- I love Common.Logging and I’ve added color coding based on TraceEventType that the Common.Logging provides to Enterprise Library. If you’re not using it yet, you might start doing so. It’s really easy to program against and swapping out one logging framework for another is a breeze as well.
**Add Common.Logging
** In this part we’ll create a new project and will add Common.Logging to the project. If you don’t want to use Common.Logging you can skip this step entirely.- After you’ve started Visual Studio, create a new Console Application called ConsoleApplication1.
- If you haven’t got the Package Manager Console available yet, do so via View –> Other Windows –> Package Manager Console.
- Open the Package Manager Console and execute the following commands
- Install-Package Common.Logging
These the regular Common.Logging classes 2. Install-Package Common.Logging.EntLib50
This is the factory-adapter specifically for Enterprise Library 5.0
- Now edit your app.config so it looks like the following
<?xml version="1.0" encoding="utf-8" ?>
<configuration>
  <configsections>
    <sectiongroup name="common">
      <section name="logging" type="Common.Logging.ConfigurationSectionHandler, Common.Logging"></section>
    </sectiongroup>
  </configsections>
  <startup>
    <supportedruntime version="v4.0" sku=".NETFramework,Version=v4.5"></supportedruntime>
  </startup>
  <common>
    <logging>
      <factoryadapter type="Common.Logging.EntLib.EntLibLoggerFactoryAdapter, Common.Logging.EntLib50"></factoryadapter>
    </logging>
  </common>
</configuration>
What we see here is the config section for Common.Logging defined and the section itself at the bottom. Here you can see the factory-adapter to EntLib 5.0.Every single logging framework needs its own factory-adapter. EntLib has several because of the different versions. You can also add log4net, Elmah, etc, etc. However you can only add one at the time. Add Enterprise Library logging In this part we’ll actually added Enterprise Library logging. If you’ve already get Enterprise Library logging set up and running, you can skip this part.
- Open the Package Manager Console and execute the following command
- Install-Package EnterpriseLibrary.Logging -Version 5.0.505.1This will add quite some references, amongst others to Enterprise Library common libraries, Unity and the CommonServiceLocator.
- In Visual Studio select Tools –> Extension and Updates. A windows will pop up.
- Select “Online” in the left pane.
- Search for “EntLib Config” and install the “EnterpriseLibrary.Config” package.
- This helps configure Enterprise Library, because all the XML for these logging frameworks can be quite hard to learn.
- After installation, you need to restart Visual Studio
- Right-click the App.config file and select “Edit configuration file”
- Select “Blocks” from the menu and select “Add logging settings”
- Click the 4 blocks in the most left column
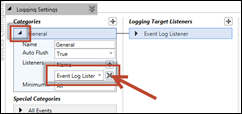
 “General” is a category. Everything you want to log with default Enterprise Library, without specifying a category, will automatically log under this category. After clicking it, you can see that it is linked to the “Event Log Listener”, which logs all information to the EventLog. Because we won’t be using this, we’ll remove the link. Click the little arrow in the left corner and the window will expand. You can see the “Event Log Listener”, click the cross behind it so it’ll be removed. You can see this in the image on the right.
- “All Events” is a catch-it-all.
- “Unprocessed Category” is where everything that does not have its own category will go through. We will use this to output the logging information to console and to a file. When appropriate, we’ll log to a specific category, but we’ll get back to that in a next blogpost.
- “Logging Errors & Warnings” is for when Enterprise Library itself crashes. This is useful for debugging purposes, but you have to be absolutely sure that this will be able to log. It’s useless to put an EventLog listener under here, if you’re not 100% sure you are authorized to log to the eventlog. As you can see this is configured by default however.
- We have now clicked all four items, but let’s have a look at default logging configuration. Click the double-arrow down to the right of “Logging Settings” and more information will open up.
- “Default logging category” has the category “General”. As said, this is where message will go to when no category is defined.
- “Warn if no category match” should be turned off. We will heavily be making use of this feature.
We’ll now add a trace listener to the “Unprocessed Category” so that our messages will be logged to file.
- In the second pane called “Logging Target Listeners” click the plus sign.
- Select “Add Logging Target Listeners”
- Select “Add Rolling Flat File Trace Listener”
- A new trace listener will appear. Let’s fill in the details
- Name : Rolling Flat File Trace Listener
- File Name : d:loggingconsoleapp1trace.logThis can of course be anything you want, just make sure the tool can log here.
- Formatter : Text Formatter
- Roll Interval : DayEvery day, a new file will be created
- Now that we’ve added a new trace listener, let’s attach this to our “Unprocessed Category” items.
- Click “Unprocessed Category” again
- Click the plus sign
- Select the “Rolling Flat File Trace Listener” we just configured.
Now we’re done with that, let’s look in Visual Studio again what changed and what will happen if we start logging.
- Save the current configuration. No errors should be at the bottom of the configuration tool.
- Go back to Visual Studio to check out the App.config and what was made of it. Make sure the Common.Logging settings we added before are still in there.
- Go to the only class in your project called “Program”
- Make it look like the code below. Do not forget to add the using statements for all classes and interfaces used.
using Common.Logging;
using System;
using System.Collections.Generic;
using System.Linq;

namespace ConsoleApplication1
{
    class Program
    {
        static readonly ILog Log = LogManager.GetCurrentClassLogger();

        static void Main(string[] args)
        {
            Log.Debug("Debug");
            Log.Info("Info");
            Log.Warn("Warn");
            Log.Error("Error");
            Log.Fatal("Fatal");
        }
    }
}
What we did was initialize the logger in the readonly ‘log’ member variable. We ask for the CurrentClassLogger. We’ll get back to this in another blogpost about Common.Logging and Enterprise Library. Next we log a message for every loglevel, according to Common.Logging.
When you execute the code, at the given location (d:loggingconsoleapp1) there should be our log-file. The content is quite verbose, but after the keyword “message”, is where our message should be provided. With our colored console tracelistener we’ll make this more visible in the console window. Add Colored Console TraceListener As said I’ve already created NuGet package for the Colored Console TraceListener. Let’s add that to our solution, configure it and look at what the code we currently have does.
- In the “Package Manager Console” execute the following command
- Install-Package ColoredConsoleTraceListener
- Compile the solution with CTRL+SHIFT+B so that the referenced tracelistener will be in the debug folder.
- If you haven’t closed the Enterprise Library configuration than ALT+TAB to that again.If you have closed it, right-click App.config again and select “Edit configuration file” again
- Add the plus sign next to “Logging Target Listeners” again to add an additional trace listener.
- Select “Add logging trace listeners”
- Select “Add custom trace listener”
- In the window that just popped up, press the “Add from file” button.
- Browse to the folder where your ConsoleApplication1 is located and find the “packages” folder, where NuGet stores its packages.Is should be located around here : packagesColoredConsoleTraceListener.1.0.1libnet40EnterpriseLibrary.ConsoleTraceListener.dll
- Select the EnterpriseLibrary.ConsoleTraceListener.dll file
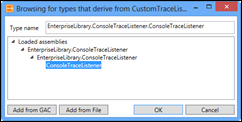
 The original window that popped up should now contain a tree where you can select the “ConsoleTraceListener” as shown in the image on the right.
- The only thing we need to configure is the formatter. We’ll create a new one because the current one is much too verbose.
- In the right pane, click the plus sign next to “Log Message Formatters”
- Select “Add Log Message Formatters”
- Select “Add Text Formatter”
- In the new formatter, set the properties as follows
- Name : SingleLineText
- Template : {win32ThreadId} – {timestamp} : {message}This contains a timestamp and the ThreadId so you’ll know which messages belong together in a multi-threaded application.
- Back to our ConsoleTraceListener where you should specify the Formatter to “SingleLineText”, which we just specified.
- Back to our “Unprocessed Category” block in the left pane. Add another trace listener via the plus sign and select the “ConsoleTraceListener”
- Save the configuration
- Go back to Visual Studio 2012
- Press CTRL+F5
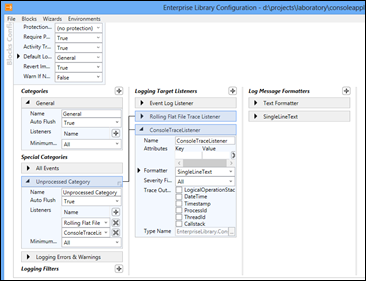
Now without changing a single line of code, the console window should look as follows. This is what we configured via our Colored Console TraceListener. At the far bottom the final EntLib Config tool.

Update : Updated for Enterprise Library 5, since 6.0 came out

